Lamination for Open Crumb: The Technique Pros Use (and When to Skip It)
Scroll through any competitive sourdough Instagram and you’ll see the same move: a baker pulling dough across a wet counter, stretching it into a window so thin you can see the wood grain through it, then folding whole grains, seeds, or sometimes nothing at all back into the sheet. This is bench lamination, and it has become the defining technique of open-crumb sourdough.
But lamination is also where most home bakers go wrong. They laminate too early, too late, or on doughs that don’t benefit. They laminate three times when they should laminate once. The result is dense, uneven crumb — the opposite of what they were chasing.
This guide explains exactly when lamination helps, when it hurts, and the timing that consistently produces the irregular, glossy, open structure you see in pro bakery loaves.
What lamination actually does to the dough
A typical stretch-and-fold grabs a quadrant of dough and pulls it maybe 20–30 cm before folding it back. It builds strength, but it also compresses existing gas pockets into roughly the same spots every time — which is one reason stretch-and-fold-only schedules often produce relatively uniform crumb.
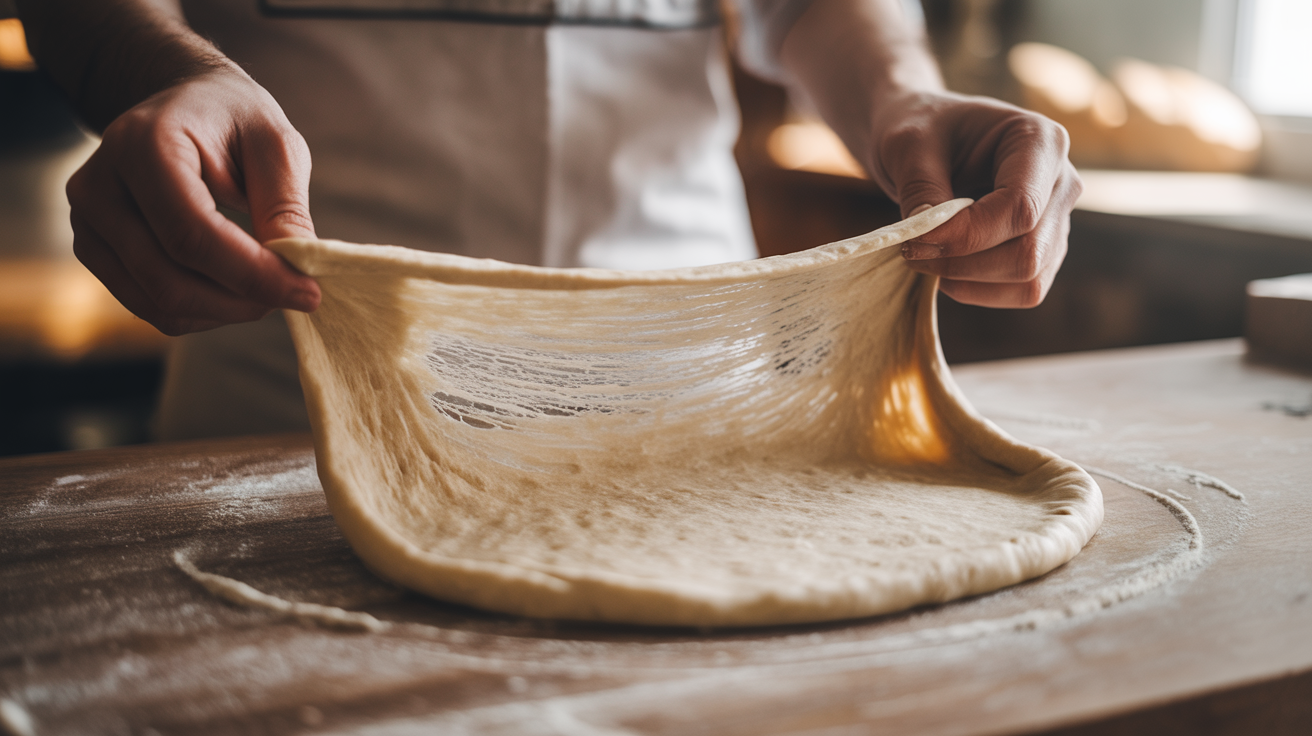
Lamination does something different. You dump the entire dough onto a wet counter and stretch it into a rectangle roughly 60–70 cm × 40–50 cm, thin enough that you can see your counter through the thinnest sections. Then you fold it like a letter — thirds in from each long side, then in half — back into a parcel and return it to the bowl.
Three things happen:
- Gluten sheets align in one direction, giving the dough directional strength it wouldn’t otherwise have at that hydration.
- Gas pockets get distributed across a much larger surface, so the bulk-fermentation bubbles that form afterward are more evenly spread — producing the irregular-but-well-distributed open crumb.
- Whole grains, seeds, or inclusions get evenly embedded across every layer instead of clumping.
The irregular, glossy open crumb that lamination enables isn’t a product of the fold itself — it’s a product of the redistribution of gas before the main fermentation kicks in.
The right timing window
Most open-crumb failures come from mistiming lamination.
Too early (before 30 minutes of bulk): The dough hasn’t developed enough gluten yet. When you pull it thin, it tears into ragged holes instead of stretching translucent. Strength after this kind of lamination is weaker, not stronger.
Too late (after 90 minutes of bulk): The dough has already trapped meaningful gas. Stretching it flat degases everything you’ve built, and you lose 30–40% of your potential oven spring.
The sweet spot: 45–60 minutes into bulk fermentation. By then, your autolyse + 1 set of stretch-and-folds has built enough gluten to stretch translucent, but not so much gas has accumulated that flattening costs you volume. Check out the signs in our bulk fermentation completion guide to make sure you’re tracking the whole schedule.
Practical timeline (80% hydration, 24–25°C room)
- 0:00 — Mix flour + water, autolyse 30–60 min
- 0:30–1:00 — Add starter + salt, mix, rest 30 min
- 1:00 — First stretch-and-fold (4 pulls)
- 1:30 — Lamination
- 2:00 — Coil fold 1
- 2:45 — Coil fold 2 (final)
- 3:00–5:00 — Rest bulk to 50–70% rise
- 5:00 — Pre-shape, bench rest, final shape, cold retard
Adjust by 15–20 minutes in each direction if your kitchen runs warmer or cooler — see our proofing time by temperature table for calibration.
Which doughs benefit from lamination
Great candidates
- 75–85% hydration plain-flour loaves — the classic open-crumb country loaf
- High-hydration doughs with 10–30% whole grain — lamination distributes the bran and prevents tight patches
- Inclusion loaves (olives, roasted garlic, cheese, seeds, dried fruit) — one lamination pass folds inclusions into every layer evenly
- Focaccia and ciabatta-style doughs — the extreme hydration benefits from directional strength
Skip lamination on
- Dough under 70% hydration — it will tear rather than stretch; stick with stretch-and-folds
- Sandwich-style sourdough — you want tight, even crumb; lamination works against that. See our low-hydration sandwich sourdough guide.
- Whole-grain-heavy doughs (>50% whole wheat or rye) — bran cuts gluten too aggressively to produce a translucent sheet; strength-building folds work better
- Enriched doughs (butter/egg/milk) — fats compromise the gluten window
How to execute lamination — step by step
- Prep the counter. Mist lightly with water — just enough to prevent sticking, not enough to dissolve the dough surface. Dry towel standby.
- Turn the dough out. Scrape from bowl in one piece; let it rest 1–2 minutes to relax before stretching.
- Stretch from the center outward. Use the backs of your hands and fingertips — not palms — to pull the dough out in all directions. Work the corners first; they’re stiffest.
- Stop when you can see through the thinnest sections. The rectangle should be roughly 60–70 cm × 40–50 cm. Don’t force tears.
- Add inclusions now (optional) — sprinkle evenly across the whole sheet.
- Fold like a letter. Bring the right third in over the center, then the left third over that. You now have a tall strip.
- Fold in half or thirds from the bottom up. Roll into a loose parcel.
- Transfer back to bowl. Seam-side down. Cover and rest 30 minutes before the next fold.
Total time on the counter: 2–3 minutes. If you’re taking longer, the dough is drying and you’re working against yourself.
What comes after lamination
This is where bakers over-correct. After a good lamination, the dough is highly organized — stretch-and-folds at this point compress the structure you just built. Switch to coil folds (see our stretch vs. coil fold guide) which lift and bundle the dough without flattening it.
One or two coil folds, 30–45 minutes apart, is plenty. After that, leave the dough alone for the remainder of bulk. More handling at this stage degrades crumb structure.
Troubleshooting
Dough tears instead of stretching translucent. Either you laminated too early (not enough gluten) or your flour is too low protein. Autolyse longer next time, or switch to a stronger bread flour. See our bread flour vs. all-purpose comparison.
Crumb is open but uneven with a big tunnel. You either under-proofed or over-laminated (pulled too thin and introduced a fault line). Stay within the 45–60 minute window and stop stretching before the dough starts shredding.
Crumb is tight despite lamination. The bulk is probably under-fermented. Lamination doesn’t create open crumb by itself — the fermentation has to come along for the ride. Use our sourdough calculator to confirm your starter percentage is high enough for your room temperature.
Dough collapses after shaping. Multiple lamination passes — don’t. One pass, followed by gentle coils.
The honest verdict
Lamination is real, measurable technique — not an Instagram trend. For high-hydration bread with whole grains or inclusions, a single well-timed lamination beats four stretch-and-folds for crumb structure and grain distribution.
But it’s not magic. The loaves that score 90+ on the open-crumb leaderboard also use strong flour, accurate percentages, correct temperatures, and gentle shaping. Lamination is one lever — the most visible one, and the one most bakers oversell — in a seven-lever system.
Get the timing right, keep it to one pass, and follow with coils. That’s the 80% of the technique that will give you 80% of the results.