DIY Proofing Box for Sourdough: Hit Your DDT on a Budget
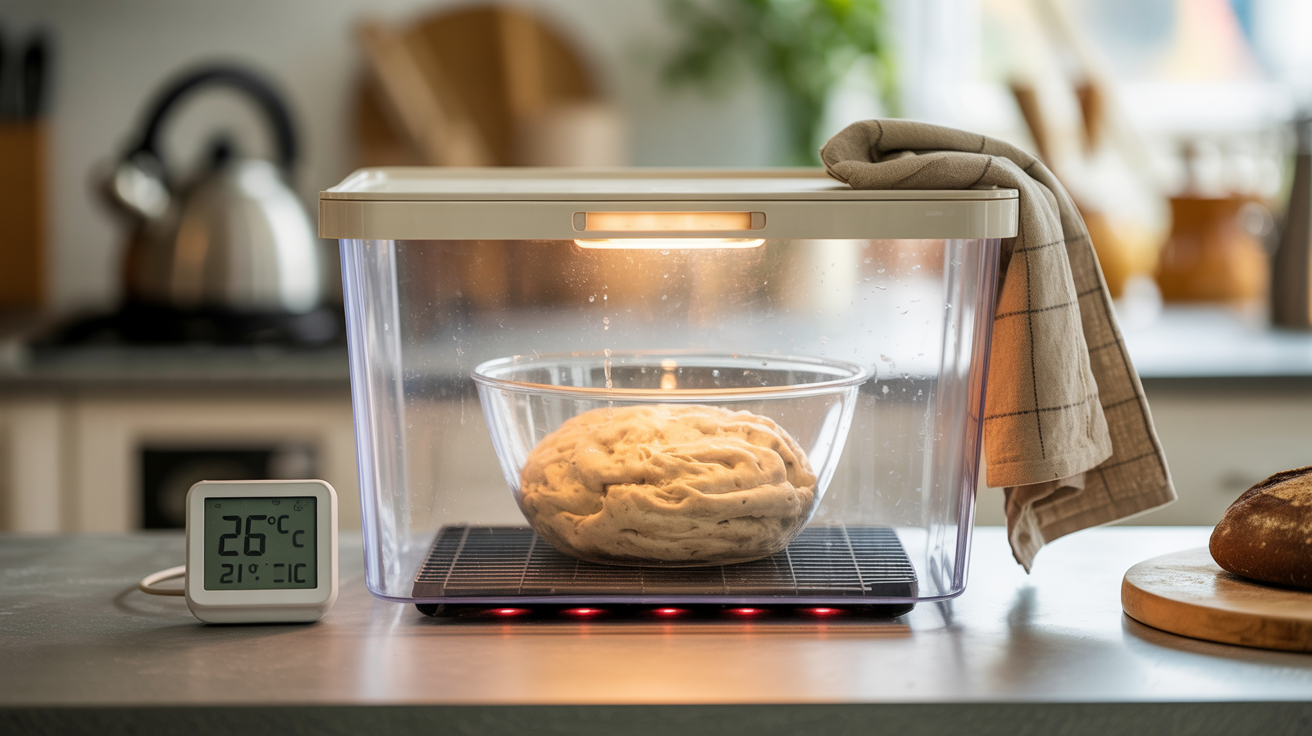
Temperature controls fermentation more than any other variable — and most home kitchens are too cold for ideal sourdough. A professional proofing box like the Brod & Taylor Folding Proofer costs $180–$300. A DIY version costs $30–$50 and works nearly as well. Here’s how to build one and use it.
Combined with our sourdough ratio calculator and a precise DDT (see thermometer and DDT), a proofing box gives you repeatable sourdough results across seasons.
Why You Need Temperature Control
Fermentation rates double (or halve) with every 10°C (18°F) shift in temperature. Real consequences:
- Winter kitchen at 18°C / 65°F: Bulk ferments in 9–10 hours (too slow, over-fermented by morning)
- Summer kitchen at 28°C / 82°F: Bulk ferments in 3 hours (too fast, underproofed when you check)
- Controlled 24°C / 75°F proofer: Bulk ferments reliably in 5 hours
A proofing box turns “I have to watch it all day” into “set timer for 5 hours.” See bulk fermentation summer vs winter for the full seasonal timing picture.
The Basic DIY Setup ($30–$50)
Three components:
- Clear plastic storage bin (12–18qt, airtight lid): $8–$15
- Seedling heat mat (medium size, 10–20W): $15–$25
- Digital thermometer/hygrometer with probe: $10–$15
How it works: The heat mat sits under or inside the bin. The bin traps the warmth. The thermometer tells you the temperature inside. Dough bowl goes inside the bin during fermentation.
Build Instructions
Method 1: Heat mat inside the bin (simpler)
- Lay a kitchen towel on the bottom of the bin to protect the mat.
- Place the heat mat on the towel.
- Place another towel on top of the heat mat (insulates dough from direct contact).
- Plug in the heat mat.
- Put the thermometer probe inside the bin, taped to the wall at dough height.
- Close the lid and let the box equilibrate for 30–45 minutes.
- Read the temperature. Adjust by cracking the lid if too hot, or covering the top with a towel if too cold.
Method 2: Heat mat under the bin (cleaner)
- Place heat mat flat on counter.
- Place bin directly on top of mat.
- Everything else same as Method 1.
Method 2 keeps the mat dry and out of the way, but heat transfer is slightly less efficient through the plastic base. Usually 1–2°C cooler inside the box.
Temperature Ranges You Can Hit
A 20W seedling mat in an 18qt clear bin typically achieves:
- In a 15°C / 60°F room: about 23–25°C / 74–77°F inside
- In a 20°C / 68°F room: about 26–28°C / 79–82°F inside
- In a 25°C / 77°F room: about 29–32°C / 84–90°F inside — too hot, don’t use heat mat
The heat mat raises temp 5–10°C above room ambient. Adjust by:
- Cracking the lid to lower temp
- Covering with a towel to raise temp
- Using a smaller or larger heat mat
- Adding an inline temperature controller (see below)
Upgrade: Inkbird Temperature Controller ($35)
If you want set-and-forget precision, add an Inkbird ITC-308 or similar:
- Plug heat mat into the “heat” outlet of the controller.
- Set target temp (e.g., 25°C / 77°F) on the Inkbird display.
- Place controller’s probe inside the bin next to the dough.
- Controller turns heat mat on/off to maintain target temp within 1°C.
This is the key upgrade that transforms “mostly close” to “exactly what I set.” At $35, it’s a no-brainer for anyone baking regularly.
Humidity Control
High-hydration sourdough benefits from humid proofing environments (prevents surface drying). Inside the sealed plastic bin, humidity naturally rises. To increase further:
- Place a small cup of warm water inside the bin.
- Or spray the inside of the lid with water before closing.
Target 70–80% relative humidity — verify with a hygrometer.
Alternative Setups (When You Can’t Do the Full Build)
1. Oven with light on
Turn on the oven light (not the oven itself). The bulb produces enough heat to raise interior temp to 25–28°C / 77–82°F. Free, but:
- Imprecise — temperatures vary between ovens
- Can’t use oven for anything else during proof
- LED bulbs don’t produce enough heat; incandescent bulbs required
Best for occasional use when you don’t want to build a box.
2. Instant Pot / slow cooker yogurt setting
Many multi-cookers have a “yogurt” mode that maintains 30–40°C. Too hot for sourdough usually, but:
- Some models allow lower temps (check specs)
- Works in a pinch for short proofs
3. Microwave with boiling water
Place a cup of boiling water in the microwave (not running). The residual humidity and warmth create a mini proofing environment. Temperature drops quickly — only useful for the first hour of bulk.
4. Sunny window (summer only)
Indirect sun on a counter or table can provide warmth. But variable and unreliable.
Commercial Alternatives (If DIY Isn’t Your Thing)
- Brod & Taylor Folding Proofer: $180–$220. Collapses flat for storage. Gold standard.
- Cambro Proofing Box: $60–$90 for the plastic container, add heat source separately.
- Countertop proofer bags: Less common, mixed reviews.
The Brod & Taylor is excellent if budget allows. But a DIY setup performs comparably for 1/10 the cost, especially with an Inkbird controller.
Using the Proofing Box
Your workflow becomes:
- Start proofing box 1 hour before mixing dough (let it equilibrate).
- Mix dough, do stretch-and-folds outside the box.
- After final stretch-and-fold, put dough bowl inside the box.
- Close lid, set timer, come back when fermentation is done.
- Dough will be at consistent target temperature regardless of room conditions.
This lets you bake reliably in a 60°F winter kitchen or an 85°F summer apartment — no need to adjust DDT for every room change.
Cold Retard Is Separate
Don’t use the proofing box for cold retard — that still happens in the fridge. The proofing box handles the warm phase (bulk ferment); the fridge handles the cold phase (final proof). See cold retard 12 vs 24 hour.
Common Mistakes
1. No thermometer inside. You’re flying blind. Always verify actual temperature.
2. Heat mat touching dough directly. Can overcook the bottom of the dough. Use a towel barrier.
3. Wrong bin size. Too big and heat dissipates; too small and dough doesn’t have expansion room.
4. Using during cold retard. Cold retard needs the fridge (2–5°C). The proofing box is for the warm phase only.
Parts List for a Complete Setup ($65)
- Sterilite 15qt clear storage bin: $10
- VIVOSUN 10”×20.75” seedling heat mat: $20
- Inkbird ITC-308 temperature controller: $35
- Total: $65
Optional: ThermoPro TP50 digital thermometer/hygrometer ($10) for extra verification.
Final Word
A proofing box is the single biggest upgrade a home sourdough baker can make after scales and thermometers. It transforms fermentation from “guessing” to “dialed in.” The DIY version costs $30–$65 and matches commercial proofers for 95% of home use. Build one this weekend and watch your consistency jump.
For the related thermal math that uses proofing box temperature, see DDT calculation.