The Aliquot Jar Method: How Pros Measure Bulk Fermentation to the Minute
Why Clocks Lie About Sourdough
Every beginner recipe says “bulk ferment 4–6 hours.” That window spans a 3-hour range because real bulk depends on a dozen variables: starter strength, dough temperature, inoculation, hydration, flour blend, room humidity. Any of those shifts by 10% and your bulk shifts by an hour.
The poke test helps — but it’s subjective. Reading the side-wall bubbles helps — but containers fog up. What you need is an objective measurement: exact rise percentage, to the minute, for your specific dough under your specific conditions.
The aliquot jar gives you exactly that. And it takes 60 seconds to set up.
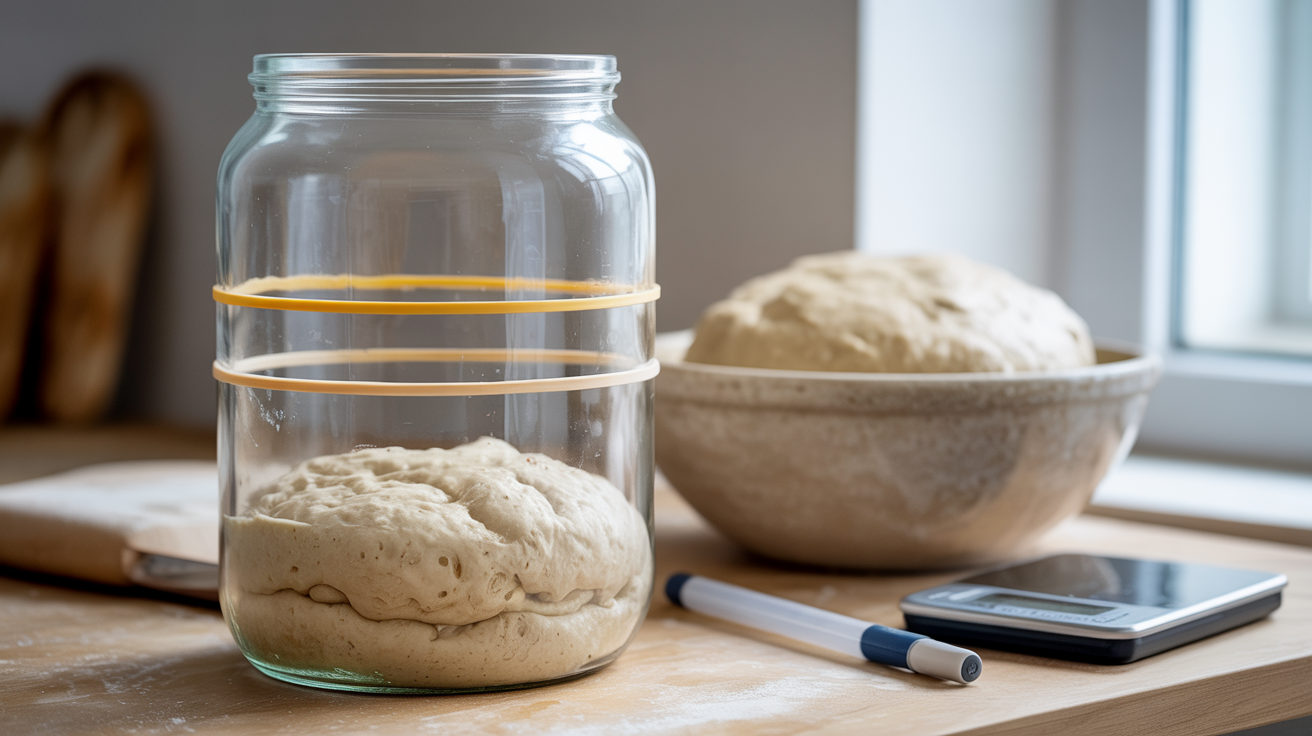
What the Aliquot Jar Is
“Aliquot” means “a representative sample” — the scientific term for a small portion taken from a larger batch for measurement.
In sourdough: after mixing your bulk dough, pinch off a small piece (about 40g), place it in a clear straight-sided jar, and mark its rise with rubber bands. Because small and large doughs ferment at identical rates when held at the same temperature, the rise of your tiny sample perfectly predicts the rise of your main dough.
When the sample hits 75% rise, your main dough is at 75% rise. Shape immediately.
What You Need
- One clear, straight-sided glass jar — an 8oz/240ml jam jar works perfectly.
- Two thin rubber bands.
- A kitchen scale.
- Wet fingertip (for smoothing).
Avoid curved or tapered jars — they give false readings. Straight sides are essential.
Step-by-Step Setup
1. Mix your main dough as usual
Include starter, flour, water, salt. Mix until roughly uniform. Done.
2. Pinch off 40g for the aliquot
Scoop a walnut-sized piece from the main dough. Weigh to confirm 35–45g — consistency matters between bakes.
3. Drop into the jar
Let the piece settle to the bottom.
4. Level the top
Wet your fingertip and press the dough gently so the top is flat. This gives you a clean starting line.
5. Mark the starting level with rubber band A
Slide a thin rubber band over the outside of the jar, aligned with the flat top of the dough. This is your baseline.
6. Calculate your 75% rise position
If the dough is at, say, 25mm from the bottom of the jar, your 75% rise mark is at 25 × 1.75 = 44mm from the bottom — roughly 19mm above rubber band A.
Shortcut: look at the starting dough volume. The rise target is about 2–3 cm above the start for a 40g sample in a standard jam jar.
7. Mark the target level with rubber band B
Slide a second rubber band to the calculated target position. This is your “bulk complete” line.
8. Store the jar next to your main dough
Same temperature, same spot. Temperature-matching is the whole point.
9. Wait, check, bake
Every 30–60 minutes, glance at the jar. When the dough reaches rubber band B, the main dough is ready. Shape immediately.
Worked Example: Standard 75% Rise
Set up:
- Main dough: 1000g total (600g flour, 75% hydration).
- Aliquot: 40g pinched off and placed in an 8oz jar.
- Starting level in jar: 20mm from base.
- Target 75% rise: 20 × 1.75 = 35mm from base.
- Rubber bands: A at 20mm, B at 35mm.
At 24°C dough temp, jar reached band B at 5h 20min. Main dough was perfectly developed — domed, jiggly, side-wall bubbles.
Why It Beats Every Other Method
vs poke test
- Poke test: subjective, depends on dough temperature, easy to misread.
- Aliquot: objective number, same interpretation every bake.
vs side-wall bubble count
- Bubble counting: slow, inconsistent, depends on container clarity.
- Aliquot: glance at rubber band, done.
vs doubling in size
- Doubling: usually means over-fermented for modern high-hydration dough.
- Aliquot: adjustable target (60%, 75%, 100%) for your recipe.
vs timer
- Timer: ignores your unique starter and kitchen conditions.
- Aliquot: reflects your exact dough, conditions, and starter strength.
Adjusting the Target for Different Recipes
Standard 75% hydration white flour → target 75% rise
Classic sweet spot.
80%+ hydration → target 85–95% rise
Higher hydration doughs need more rise to develop full gluten network. Use band B at ~85–95% target.
Whole wheat or rye blends → target 60–70% rise
Whole grains ferment faster and have weaker structure. Shorter rise prevents collapse.
For 24-hour cold retard → target 60–65% rise
Fermentation continues slowly in the fridge, so you want to stop bulk earlier.
Enriched dough (butter, eggs, milk) → target 70% rise
Fats slow fermentation and reduce oven spring ceiling.
Advanced: The 40g Reusable Aliquot
If you don’t want to sacrifice 40g from each bake, add 40g extra to your mix. Pinch 40g off for the jar; the remaining dough is the normal batch. Zero waste, permanent setup.
Troubleshooting
Jar dough rises much faster than bulk
Two reasons: (1) aliquot is in a warmer spot (top of jar near lamp, on a warm counter). Move to identical temperature. (2) Main dough is too cold at its core. Use a bigger/warmer mixing bowl.
Jar dough rises much slower than bulk
Rare. Usually means the aliquot was poorly mixed or under-incorporated starter. Always take the sample after complete mixing.
Sample doesn’t rise at all
Your main dough also isn’t rising — starter issue. Abandon the bake, feed starter, try again tomorrow.
Jar dough hits the rubber band but main dough looks weak
Usually a sign of cold main dough (skin cold but core still behind). Wait 20–30 min and check visuals.
FAQ
Does sample size matter?
Keep it 30–50g. Too small (10g) fluctuates too much; too large (100g+) acts like a different fermentation entirely.
Can I reuse the aliquot dough?
Yes — fold it back into the main dough at shaping, or bake it as a tiny roll.
Does this work for cold bulks?
Yes, but progress is slower (10–15% of room-temp speed). Use the 60–65% rise target if cold-retarding 24h+.
What jar size is best?
6–8oz (180–240ml) clear glass jam jar with straight sides. Mason jars work too if they’re straight.
Next Steps
Set up your aliquot jar on your next bake — one jar, two rubber bands, 40g of dough. After 3 bakes using this method you’ll never go back to guessing. Combine with our bulk fermentation signs guide to confirm readiness, and the temperature chart to estimate timing upfront. Use the sourdough ratio calculator to scale recipes precisely.